(864) 710-7964
info@rrrtoolsolutions.com
308 Lightfoot Road, Abbeville, AL 36310
Motorcycle Wheel Lacing For Hub Spokes and Rim

Motorcycle Wheel lacing and truing are two procedures that I had to teach myself how to do many years ago. Next to engine building, I enjoy wheel lacing and truing more than any other rebuild.Sooner or later, most of you will want to change your wheel color, have your rims re-chromed, powder coated, or to simply replace the broken/bent spokes like we’re doing on our Yamaha TTR225 project bike. Spoke lacing and truing are easy if you’ll break it down into 4 Basic Steps. The spider webs and confusing intersections get crystal clear if you’ll apply these simple rules.
Before You Start Lacing Your Wheels
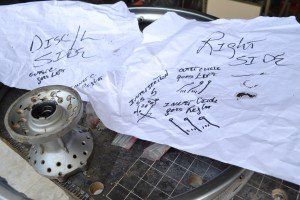
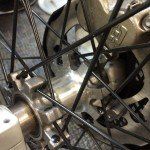
Before you remove the existing spokes, take photographs of the wheel making sure you have clear images of the hub and spoke intersections.
Make notes and drawings of how the spokes are oriented on the hub. You’re looking for a pattern of “Outside” and “Inside” Spoke threading. You’ll be noting whether the “Outer” spokes point left or point right as they come out of the hub – Note the pattern is almost always identical on both sides as you flip the wheel over..
Your notes should include the count of spokes in-between repetitive spokes (for example, this TTR225 front wheel has every 5th spoke on the hub identical in direction and angle as the 5th spokes before it and so on).
Pay special attention to “spoke type”. As you’ll see in the included photos, wheels can be very different – fronts
different than rears, drum brakes different than disc brakes, vintage different than modern, and specialty wheels are almost custom to the application.
If you are not refinishing the hub with polishing, paint, or powder coat then I suggest that you make alignment marks on the hub indicating spoke directions for each of the “Outside” and “Inside” spokes. This is especially helpful on your first few wheels and can easily be wiped away with rubbing alcohol when you’re done. You’ll see those markings I’ve added to our TTR225 hub for illustration.
Spokes can be cut for quick removal if you’re not reusing them. Of course they can be unthreaded – reverse of installation for use later on.
Recognize your wheel and spoke type
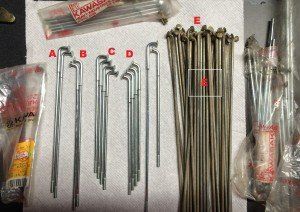
As shown in the included image, Spokes A and B are “Pairs” to the same wheel.
Spoke A is an Outside spoke and goes to a narrow front disc hub. The “mild” acute angle means that this spoke comes from the outside of a small, narrow hub and will reach the center of the 19″ rim with the long spoke.
Spoke B is an Inside spoke and goes to this same narrow front disc hub, Here the “mild” obtuse angle means that this spoke comes from the inside of a small, narrow hub and will reach the center of the 19″ rim with the long spoke.
Spoke C is an Outside spoke and goes to wide, rear drum brake hub. The “moderate” acute angle means that this spoke comes from the outside of a larger diameter hub and will reach the center of the 18″ rim with a much shorter spoke.
Spoke D is an Inside spoke and goes to this same narrow front disc hub, Here the “moderate” obtuse angle means that this spoke comes from the inside of the larger diameter hub and will reach the center of the 18″ rim with a much shorter spoke.
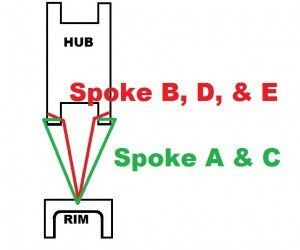

Spokes E are all exactly “Same”. Our TTR225 front wheel uses all the same 36 spokes routed to the inside and reach the rim center. A special hub is used to create the spacing so exact spokes man intersect and route directly to the rim center.
I have attached a drawing to show how these hubs and spokes differ between A, B, C, D, and E.
Insert all of the spokes on both sides of the hub
Whether you have 36, 40, 60, even 80 spokes – all have to be inserted into the hub.
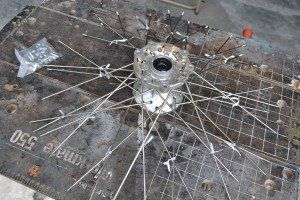
Lay the hub onto a wide, flat working surface and arrange the spokes in an even starburst – don’t worry about crossing the pairs yet. Once you have all of the spokes lying flat on the bottom, table side you can concentrate on getting your “pairs” matched and tied for the top-side spokes.
Only work on one side at the time. I always work with the top. When done with the top side, I flip the hub over and do the new top side. Using your notes, the photos, or the marks made on your hub you’ll start arranging your Inside and Outside spokes so that each group (Inside or Outside) all point the same way.
Note
All Outside spokes go in only one direction. They either all “Go Left” or “Go Right”
Note
All Inside spokes go in only one direction. They either all “Go Left” or “Go Right” – They will be opposite of the Outside spokes.
Note
All Outside spokes go on top of the Inside spokes. This Outside/Inside criss-cross keeps the spokes straight and makes the intersections natural. Nothing bends or is forced.
Use the small, paper covered wire ties that come in trash bags to tie your criss-cross intersections. These do a great job of organizing your spokes and keeping their triangulated shapes. Flip the hub assembly back over and do the new top side.
For 36 spokes, you will have 18 bag ties and intersections paired, 40 spokes and 20 pairs, and so on. Get the spokes as organized as you can. You’ll want to have the threaded ends spaced evenly around the circumference. Look at the rim and the dimple spacing for orientation.
When you have the spokes organized (now held in-place with bag ties), you’ll find that the circle is actually smaller than the rim. Apply a small amount of lubricant onto the threads (grease or oil) – don’t make a mess, just a little is used.
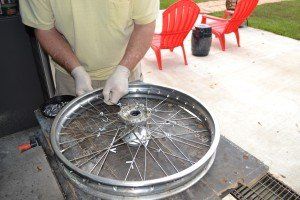
Place the rim onto the flat surface and around your new hub and spokes. You’ll be using the supplied nipples to thread the rim onto the spokes.
Go around the entire rim and thread the nipples one at the time, but do not go more than a few turns – you’ll need the free-play to get all the spokes threaded.
Look closely at the dimples of the rim and the spoke you’re threading – they should be perfect for each other. The dimple should be aligned perfectly to the direction and angle that the spoke is coming from. If not – something is wrong with the thread-up.
Note
Bearings have to be installed at this point. If you have removed them and haven’t replaced, you have to do that before you can begin the Truing step.
Truing and Torquing
Now that all of the spokes are installed and threaded, you’ve got a loose rim and spokes ready for truing and torquing.
You will need a Truing or Balance Stand. You can make one or use a shop balancer like the one seen here, but the hub has to spin freely and accurately in order to make the adjustments for truing.
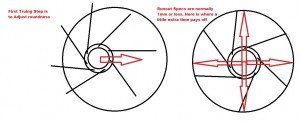

Work on getting the wheel “Round” first. Go slow on the spokes, I have a rule of making no more that 1 turn of the nipple every rotation. It is very important that you don’t pull the rim out of round and that you don’t get the spokes on one side too short.
Maximum torque is 4~5 lbs/feet. You want to rotate the wheel and turn the nipples a little at the time while observing the run out.
I don’t use fancy equipment. My favorite pointer is a wooden paint stirring stick. It’s cheap, it doesn’t scratch, and I simply clamp it to the leg of my balancer and spin the wheel. I have dial gauges, but find the paint stick is better!
Time, patience, practice. Get it right. Loosen the nipples if the wheel won’t move in or out as needed.
Don’t over tighten, you can break a spoke and most manufacturers don’t sell singles. You can deform a rim – I’ve seen them pulled to beyond usage.
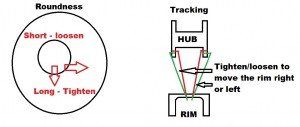
Tighten the 5 to 6 spokes on the long side ( the part of the rim that hits the stick first is called long). If you’ll stick to a 1/2 turn of the nipples as you go around and work on the longs first – you’ll often find that truing is accomplished faster by going slower.
Fine tune your True by getting all of the Longs even and don’t overlook the shorts (where the spokes are already too tight) as you may have to loosen. Once your “Roundness” is perfect (again, take your time and enjoy the tuning), you’re ready for Tracking
Tracking is how straight the rim “tracks” as the wheel rotates. You now want to remove that side-to-side wobble. This technique is different in that you’ll identify the areas where the rim is pulled too far left or right. I try to adjust both for left and right concentrating on the extremes first and then fine-tuning.
Facing the rotating rim, place your pointer to one of the sides. Find the extremes of where the rim wobbles right or left and adjust your spokes in that exact area. You’ll notice that the rim has spokes pulling it right and left. Try first to tighten the “short side” so that those spokes are pulling the rim away from the pointer. Do not exceed that torque spec as they will break. If the rim is too far left, tighten the spokes pulling it right. The same is true for a rim too far right – you’ll tighten the spokes pulling it to the left.
If at any time you cannot achieve the movement needed to True the wheel without exceeding the torque spec, you will need to loosen the opposite side. This is true for Roundness and for Tracking.
When you’ve got that perfect roundness and the tracking is to your satisfaction (specs say 1mm run out or less), you still have to make sure the spokes are all tight. Check every spoke for torque – going around the rim as you do it – Go Slow and you won’t pull anything out of shape. I do mine while still on the stand and my pointer in place. This way I can be sure that I’ve got everything torqued and True.

Motorcycle Wheel Lacing and Truing (video)
Published on Jan 14, 2016
I am going to show how with a few trick you can make lacing and truing a motorcycle wheel easier if not a pleasurable experience. With these simple steps you can make motorcycle wheel lacing and truing a neat and organized process